What does it take to turn an empty lot into a vibrant play space? Installing a playground is more than just placing equipment and pouring concrete - it’s a step-by-step journey that brings communities together through teamwork and shared pride.
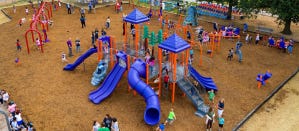
Rich Sinclair knows a thing or two about community builds. As part of Sinclair Recreation, the exclusive GameTime representative in Michigan and Indiana, he’s led projects that bring people together—like the installation at Water Tower Park in Holland, Michigan. Here, he walks us through the installation process and shares how community involvement can make all the difference.
The Benefits of a Community Build
A community build happens when the playground purchaser partners with local volunteers to install the new play space. It’s a great way to lower project costs while building a strong sense of community pride.
The Water Tower Park build in Holland, MI is a perfect example. Thanks to the hard work of dedicated volunteers, Rich Sinclair and his team completed the installation in just one day, creating a shared accomplishment the entire community can celebrate.
The following describes the steps Rich Sinclair’s team took to ensure a successful community build.
Step 1: Preparing the Site
Every playground project starts with careful site preparation, which includes removing any existing equipment or surfacing and ensuring the ground is properly excavated.
“If there’s safety surfacing that has to come out, it needs to be cleared so we’re ready to dig holes for the new equipment,” says Rich Sinclair. The ground must be level and bare before installation can begin - otherwise, new surfacing or equipment could be at risk for improper installation.
Step 2: Layout and Excavation
Once the site is prepped, the team lays out the design and marks the location of each footing hole. These holes are then dug to the correct depth and checked with a laser level to ensure accuracy and proper alignment.
Step 3: Equipment Assembly
With the holes dug and ready, the real fun begins: assembling the playground equipment. At Water Tower Park, towers, slides, and climbers were first constructed off to the side, then carried into place with the help of volunteers.
“We built each of the towers individually and brought them over to connect them together with features like overhead climbers and stairways. It’s teamwork at its best,” Rich Sinclair comments. With everyone working diligently together, all the equipment was assembled within a single day.
Step 4: Concrete and Clean-Up
Once the equipment is positioned, the team pours concrete footings to firmly secure the structures. They then backblade and clean the site, clear spoil piles, and prepare for the final touches.
“It’s all about making sure everything is plumb, level, and safe before the concrete goes in,” Rich Sincair notes.
Step 5: Final Steps
After the concrete sets, the final step is backfilling and installing surfacing, ensuring children are comfortable while they play. With that, the playground is ready for new adventures!
Support at Every Step
Playgrounds bring people from all backgrounds together through play, and community builds take that connection even further. By involving neighbors in creating a new play destination, these builds foster a shared sense of pride rooted in collaboration and hard work.
Whether you choose a traditional installation or a community build, GameTime is here to support you every step of the way. Contact your local GameTime Rep to learn how to bring your community together with a new playground.